Friday, 24 April 2015

The Beauty Vine's Cacao Triple Threat | Face, Body and Belly


I have a lovely concoction of Raw Cacao treats for you today! Three ways to incorporate a little bit of raw cacao magic into your beauty routine.

A deep cleansing face mask from Black Chicken Remedies, a luscious body scrub from Buddy Scrub, and a delicious, guilt free hot chocolate to warm your belly, all using the nutrient rich raw cacao.

Raw cacao is the new superfood. It is full of amazing, skin friendly vitamins and minerals, like magnesium, vitamin C and omega 6 fatty acids, and a plethora of antioxidants.  These all work to increase blood flow and promote cellular healing, two important processes of the body that promote glowing skin.

Raw cacao also contains mood boosting compounds Serotonin, Dopamine, and Adandomide, just to name a few. These compounds can contribute to feelings of pleasure and happiness, elevating your mood and giving you a feeling of general wellbeing.


The Beauty Vine's Cacao Triple Threat


Black Chicken Remedies Cacao Revelation Mask


I purchased this mask quite a few months ago now, right after it launched. I was extremely privileged to have the opportunity to trial a sample of the mask prior to it's release. If you are a regular reader of my blog, you might have read my post on Black Chicken Remedies, an Australian, natural and organic line of luxurious skincare made lovingly here in Sydney. Its pretty safe to say that I adore all of their products, and this mask is no exception.
Black Chicken Remedies state that this mask will deeply cleanse, gently stimulate circulation, reduce inflammation, smooth and refine, and assist in the treatment of acne and problem skins. I have most certainly found it to do all of those things. Raw Cacao, White, and Pink Kaolin clays deeply cleanse and purify the skin, Aloe Vera powder and Olive leaf extract provide vitamin C and antioxidants, healing and stimulating circulation.
As you can see from the photographs below, this mask comes in powdered form. It's as easy as mixing a teaspoon of the mask with a small amount of water, until you have a thick, soft, paste consistency. It does take a little trial an error adding your water...it is a little bit like making icing...add too much water and it immediately becomes too runny. Just add very small amounts at a time, mixing as you go. If you fancy a slightly more moisturising mask, add a little bit of honey to your mixture. I like to use Manuka honey, because of its antibacterial and healing properties.
I apply the mask to freshly cleansed skin, and leave it to dry, which takes around 20 mins for me. This is a mask that dries right down, and hardens on your skin. To remove, I will place a soaked flannel over my face to soften the mask, and then rinse most of it away with warm water, and finish off with another warm flannel.  My skin feels perfectly clean, looks brighter and more refined, and has a lovely glow. I typically mask in the evenings, and will normally follow up my mask with a facial oil ( I can warmly recommend Black Chicken Remedies Love Your Face Serum...glorious).


I purchased the mask in a set, which is still available to purchase and currently on sale! It includes the mask, a measuring spoon, a brush to apply the mask, and a lovely thick muslin cloth for $84.50AU. You can also purchase the new Spa2go pack, which includes a beautiful selection of Black Chicken Remedies products in trial sizes, including the mask, for $59.95AU. Spa2go gives you everything you need for several gorgeous at-home facial treatments. You may also purchase the Cacao Revelation mask on its own, for $69.95AU.

International shipping is available, follow the link here to the Black Chicken Remedies website.

If you would like to read my post reviewing quite a few of the other products in the range, please follow the link here.


Buddy Scrub

Buddy refers to himself comically in the first person, and if you follow him on Instagram you may notice a plethora of gorgeous scantily clad babes smothered in this lovely body scrub. I'm sorry to say that my pictures are more of a G rated variety. Not a side boob, six pack or svelte body to be seen here at at The Beauty Vine HQ! Buddy was kindly gifted to me....Buddy you 'ol softy!
Whilst this body scrub won't transform you into supermodel ( sorry ), it will leave your skin gorgeously soft and moisturised. I adore it. It has a lovely texture that smooths onto your skin without falling off you in chunks and plopping uselessly on the shower floor. For me, it has just the right amount of exfoliation. As you massage the scrub, the sea salt and brown sugar gradually dissolve, transforming into a smooth lightweight oil. As well as the skin nourishing raw cacao, it contains Coconut, Sweet Almond and Grape Seed oils, and is beautifully scented with Orange essential oil.
I did have a little trouble with the packaging, and found that I couldn't re-seal my bag properly. It is important to keep the contents fresh to avoid contact with air and heat. I ended up transferring my scrub into an air tight, preserving jar that I purchased from a local supermarket. Easy fix!


Buddy is Australian made in the city of Melbourne, uses all natural ingredients, and is cruelty free. It retails for $15.95AU, with free shipping Australia wide. International shipping is available.

You can head over to the Buddy Scrub website here. You might also notice the quite new Green Tea Scrub, which retails for $14.95AU.... this one is on my list!

Buddy is very generously offering my readers a discount code to receive 15% off your order! Simply enter " thebeautyvine" when you are at the checkout! You're welcome!

Buddy Scrub is also now available at some selected Woolworths supermarket stores.


Raw Cacao and Honey Hot Chocolate


I shall preface this by saying that I was experimenting a few months ago making a raw cacao hot chocolate, and came up with this very simple recipe. It's not rocket science by any means, I just used my common sense, but if you google raw cacao hot chocolate you will find a plethora of extremely similar recipes. I'm not saying that I am the sole creator of this recipe is all!
I enjoy this anytime of the day, but particularly in the evening.

What you will need;

1 cup ( 250mls ) Milk ( from your chosen beast, grain, nut etc. I like using Almond or Coconut )
1 teaspoon Raw Cacao
1 teaspoon honey ( I use Manuka Honey )

Optional extras - drop of vanilla essence, or pinch of ground cardamon.


What I do;

Warm milk on stove gently.
Once milk is nicely warm, add cacao and stir.
Finish off with a teaspoon of honey and stir for another minute until it has dissolved.

Serve and enjoy!


Raw Cacao and Honey Hot Chocolate - Cheers!


I really hope you enjoyed this post! Please leave me a comment below if you have a favourite raw cacao beauty product or recipe! I'd love to hear from you!


Thanks so  much for stopping by!


Blessings!


Lou xo


Disclaimer: I have no affiliation with the brands mentioned or pictured in this post. I receive no renumeration if you use the discount code to purchase Buddy Scrub, it is kindly offered by the company, for you! PR gifts are stated in the body of the post, all other products were purchased by me, except the cacao powder which my dear old mum bought me! Have a lovely day! xo

Sunday, 19 April 2015

Affinage Professional Hair Care | Review


Discovering great products is a thrill for a beauty lover like myself. Having the opportunity to share them with you here on my blog is indeed a privilege, and equally as thrilling to me.

I was recently contacted by Affinage Professional to see if they could send me some hair care products to try. I had not heard of Affinage, but was immediately delighted to learn that they are an Australian company, offering both salon colour products, as well as an extensive range of shampoo, conditioner, styling, and treatment products. 

Today, I would like to share with you the travel pack that I received. Three of these products are empty, and the fourth is getting close... if that gives you any indication of my thoughts!

I have always loved trying new hair care, and although I love many brands, I have never really been loyal to just one, and I find that in most cases my hair seems to like the change. For reference, I have blonde, shoulder length, highlighted hair, which is quite fine in texture. I like my hair products to be nourishing and moisturising ( because I terrorise it with bleach ), without making it heavy, limp and greasy looking. It's a pretty fine balance to get right, and my expectations are pretty high...


The travel pack that I received is one of four available, and contains products within a few of the different ranges that Affinage offer, all packaged nicely in a sturdy, well made re-usable pouch. 


White Ice is one of the ranges within the brand. It contains five different formulas of shampoo and conditioner, and one treatment product. 

Affinage Professional White Ice products boast a unique Diamond Blend formula, comprising of three C's;


CUT - Silk, Green Tea and UV filters protect, strengthen and shine

COLOUR - Cashmere, Rice and Milk Proteins replace essential nutrients

CLARITY - Pearl extract achieves an illuminating and radiant result


White Ice Moisturing Shampoo ( RRP full size 200ml  $21.00AU )

White Ice Moisturising Conditioner ( RRP full size 200ml  $21.00AU )

I was hooked on these from the first use. The shampoo creates a beautiful, velvety soft lather, smells gorgeous, and leaves your hair and scalp feeling so clean without a hint of squeak! You know when you have your hair washed at the hairdresser, and it feels so clean? Well that is exactly how this shampoo made my hair feel...glorious.
My scalp is often sensitive, and sadly, being acne prone as I am, I often experience acne on my scalp, and around my hairline as well (oh the joys). Whilst using these products, my scalp was calm and comfortable, and I did not have any nasty lumps or bumps...at all.
The conditioner smells equally lovely, and despite being quite a thick, cream consistency, managed to smooth and soften my hair, and rinse away easily, leaving no heavy residue. Both products are sensorily a pleasure to use, for the lovely fragrance and beautiful texture, and left my hair feeling fresh, clean and shiny. Sadly, both of my bottles are well and truly empty. Love.


The Affinage Liquid Luxury Fusion Treatment ( RRP 30ml $11.00AU ) belongs to the Essential Oils range. These products are all sulphate, silicone and paraben free, and again, offer a wide range of shampoos, conditioners and moisturising treatments for all hair concerns.


Liquid Luxury is unlike any leave-in conditioning product I have used before. I applied this to my freshly washed, damp hair, as a leave in treatment. It has a very liquid texture, and you need to give the bottle a shake first. Given it's thin consistency, I dispense a small amount into my palm, smooth it in my hands, and then work it through my hair, adding a little more to the ends if I feel I need it. It is so lightweight you almost don't even feel the product in you hair, but it starts to soften and smooth it immediately. Post blow dry my hair felt so soft and silky, and looked so shiny, which is something that is hard to achieve with blonde hair. Even left to air dry, my hair just looked and felt healthy and shiny. And yes, it smells amazing, thanks to the Orange, Rose and Lavender oils it contains. Sadly, this too is empty...someone give me a litre bottle thank you...


Affinage Professional Black Ice Thermal Shield ( RRP 100ml $14.00AU 200ml $21.00AU ) is part of the Black Ice range, and is one of six products designed for the styling and finishing steps in your hair care routine.

Not only does Thermal Shield contain the Affinage Diamond Blend, it also contains Pomegranate extract, Blackberry leaf extract, Coconut oil, and Almond extract to protect and nourish your hair. It is not designed to add any extra hold to the hair, but is lightweight enough to easily layer other saying products over it. I love the pump, it sprays nice and evenly, and like the other Affinage products, smells gorgeous. Love.


Below, you will find the four different varieties available in the travel packs, which retail for $29.00AU. The shampoo, conditioner, and thermal shield  in these packs are all 100ml size, which I believe gives you a great amount of product to try. The treatments are 30ml size, and are very concentrated, so you only need a little each time. The pack I have spoken about today is the Moisturising Travel Pack.


Image courtesy of Affinage Professional


Head over the Affinage Professional website here to view the full range and find your local distributers.


Have you heard of Affinage Professional? Have you tried any of their products? 
Let me know your thoughts in the comments below!


Thanks so much for stopping by!


Blessings,


Lou xo


Friday, 17 April 2015

Manicures of the Month


Hmmm.... I may need to re-think the name of my polish posts, seeing as it has actually been close to three months since my last Manicures of the Month! Can you believe we are already half way through April?! Craziness folks!!

The weather is certainly starting to cool down here now... we are halfway through Autumn ( Fall for you loves in the northern hemisphere ), which is my absolute favourite season. I love the freshness of the mornings, and the warmth of the day, followed by the cool again in the evening. Glorious.


Righto then, enough about the weather! Come and have a nosey at some of my most recent favourite manicures!


POWDER PERFECT - LORELEI

One of the beautiful polishes from Powder Perfect's Mysterium Magnum Collection, Lorelei is a stunning blue/purple with subtle pink and teal micro-glitters. Slightly deeper in real life, this polish is all sorts of pretty. Two easy coats...and get ready for lots of compliments on your nails. Love.


POWDER PERFECT - ITERU - The River

Powder Perfect's most recent collection The Lower Kingdom has many stunning glitter shades, but Iteru certainly stole my heart. Careful application could see you happy with just one coat, but the depth of the polish increases with two. You could certainly leave this without a top coat for a matte/textured finish, but I just love the added dimension and shine that a top coat gives. Love.


POWDER PERFECT - Vault of Heaven

Yep. Another Powder Perfect polish...and I'm not sorry! Vault of Heaven is a stand alone shade, and still available to my knowledge. Unequivocally the most unique polish in my bulging collection, and one of the very few polishes that I have a back-up of...She glides effortlessly onto the nail and results in constant inspection, admiration and appreciation. Gorgeous depth, and holographic glitter flakies...be still my beating heart...a tad dramatic I know. Get it while you still can!! Obsessed.


OPI - Don't Bossa Nova Me Around

Without a doubt, one of my all time favourite nude polishes. I love the cool, blush undertones, which I find to be flattering next to my skin. It's always tricky finding a nude polish that compliments your skin tone...many are too warm for me, and instantly make my hands look a horrible shade of pink. Don't Bossa Nova Me Around has a beautiful, smooth formula which is opaque in two coats. Nothing like  fresh, nude polish on your nails to make you feel like a million bucks in my opinion. It's the manicure equivalent of a great fake tan...


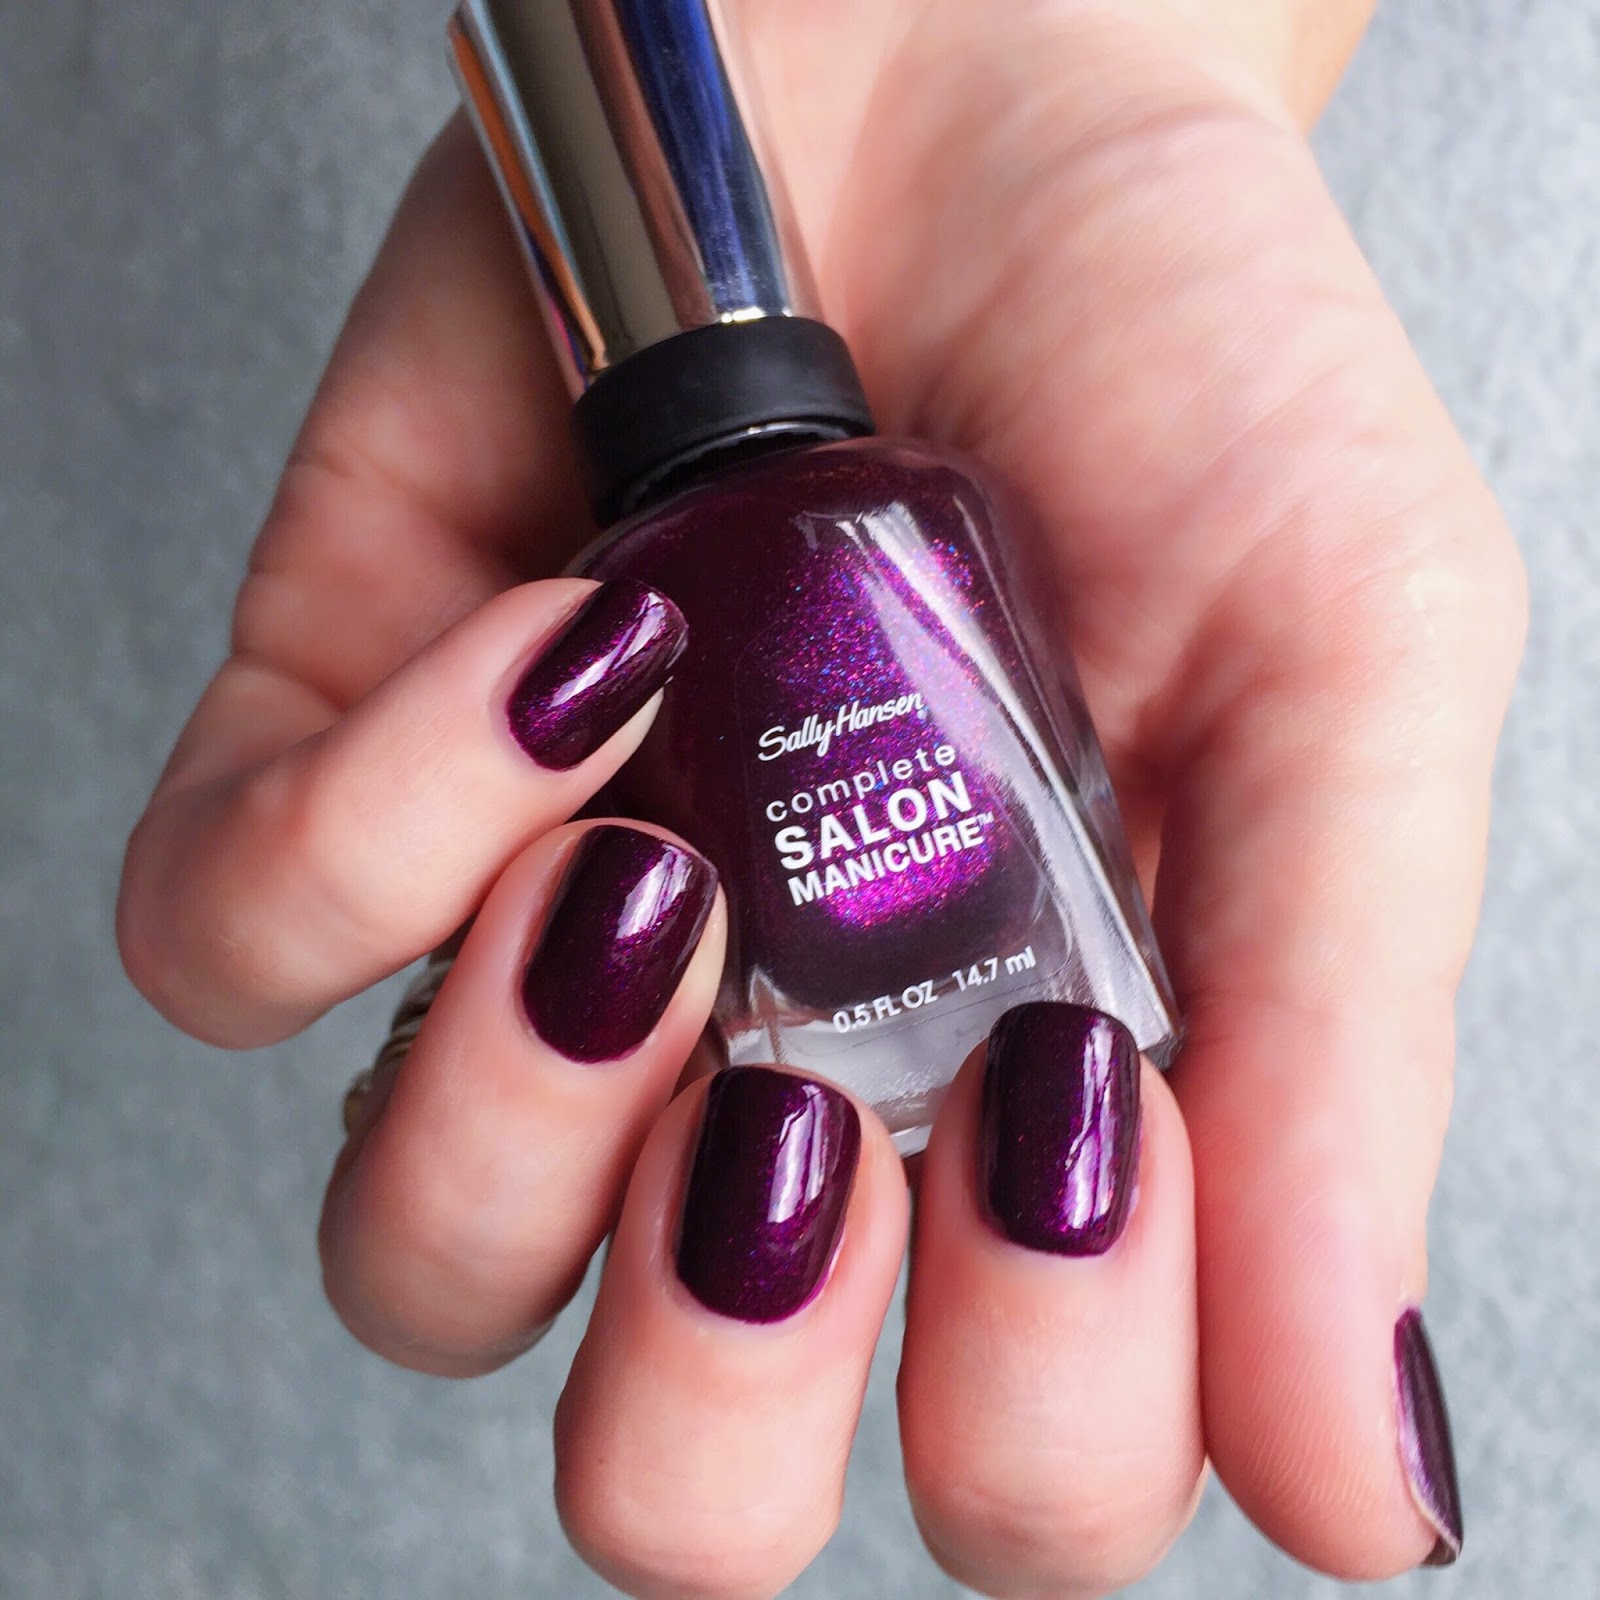
SALLY HANSEN - Rule Of Plum

Rule Of Plum is part of a recently released, limited edition set of 6 polishes from Sally Hansen called the Red Carpet Collection. Fuschia, blue and gold micro-glitters in a deep plum/berry base...once on the nail, the shimmer is subtle, but so pretty when the light hits it! Deep and delicious!


MARC  JACOBS - Blue Velvet

Yes. I bought a high-end nail polish! My first one! Sephora has recently opened in Sydney, ( YAY! ) and I picked this gorgeous blue shade during my first visit there in February. It has a beautiful formula, absolutely intense pigment, and is very, very close to only needing one coat. She is a little shy in the shade, coming across as more of a deep dark teal, but you can see the pretty green shift that comes to life in the sunshine. For the price I paid, I'm not sure that I will be rushing out to buy any more shades, but I shall certainly enjoy this one!


Do you have any high-end nail polishes? What are your favourite brands or shades? Let me know in the comments below!


Thanks so much for stopping by!


Blessings,


Lou xo


Wednesday, 8 April 2015

Date Night Hair | My Easy Side Chignon

In all honesty, date nights are few and far between in my household. Not because we don't want to, just the logistics of having our four children looked after, and juggling my shift work makes things a little difficult. Typically, date night in my house will be some nice take-away of some description, and a bottle of wine after the children are in bed! I know, setting the world on fire aren't we?

I have a relatively uncomplicated up-do to share with you today, featuring some Joico styling products that I was recently sent for consideration. Joico is a very well known and trusted haircare brand that has been around for almost as long as I have! I remember using the infamous K-PAK line of products when I was in my very early 20's.

This type of style, the side bun, is a favourite of mine for a night out. I think it is such a sophisticated way to wear your hair... chic and timeless. 

I would normally have spent some time desperately trying to inject some volume into my fine hair by teasing and back-combing, but with these products I didn't need to at all, and if you have a similar volume-less hair, then these products might interest you!

My hair is roughly shoulder length with long layers, frequently doused in highlighting foils, and though fine in texture, there is a lot of it. A side bun for me takes a few tricks, so do read on if you are interested! Allow me to preface this post by saying that this is by no means coiffed or perfected... do note that I am very much the amateur, home self-stylist.


The Tools...

1. You may start with freshly washed hair if you wish. I have done these steps on second day hair with no problem.

2. Product...I concentrated the Joico Body Luxe Root Lift Volumizing Foam to my roots, starting at the crown. I found it easiest to section the hair, apply the foam in roughly a 5cm strip, and then lift another section of hair, and continue the same, keeping each section about an inch apart. I just applied it where I want volume, essentially around the crown, however you can use it all over if you wish. I massage it in well, pulling it down slightly to the mid lengths, and apply some heat protectant to the ends.

3. Blow dry time... Now you can spend some time sectioning, and round brushing if you wish, however I tend to just tip my head upside down and give it a good a tousle, encouraging the mousse to work it's volume magic, and use a paddle brush to smooth the ends. You can definitely feel the mousse working, giving grip and lift at the roots, and it does this without the sticky, tacky feeling that some products can leave. I really like it.

4. Curling... This is a step you can skip if you like, particularly if you have longer, or more naturally voluminous hair. I feel that it adds to the finished look for my hair, and actually makes it easier for me to do it! I curled my hair with a 3/4 inch clip barrel, mainly curling away from my face. The top section of hair on the right hand side ( the side my bun will be on ), I curl towards my face. As you can in the pictures below, it helps to give a bit more volume at the side, and I think it looks nice!

5. More product... curling done, I move on to the Joico Flip Turn Volumizing Finishing Spray, which in my humble opinion works brilliantly as a working hairspray. Following curling my hair, I spray a small amount of this, again into the root area, and massage it in, one section at a time. No need for any back-combing with this, it does the job brilliantly, and just adds some extra oomph to what the mousse has already done. Be very sparing if you use it as a finishing spray, it packs an absolute punch, and it is a little difficult to rearrange anything once this baby has set.

6. Twist and Pin... I start twisting my hair just behind my ear, following along my hair line, heading in the direction of my other ear, where my bun will be. The main reason I do this, is to stop the shorter layers of my hair from escaping and causing chaos by flopping out of the bun! I place a few bobby pins in as I go. Once the bulk of my hair is on the right hand side, I twist and pin the larger front section of hair behind my ear. Now the rest of the hair pinning is a bit pot luck, but I try to eventually end up with a bun type shape, tucking and pinning as I go. I tends to look a little different each time I do it, and I don't mind if it looks a little rustic. Just keep practicing... you will find a way that works best for you!

7. Accessorise... totally optional of course, and entirely dependant on personal taste. You may think my flower looks a little nuts! My husband thinks my style is a little reminiscent of Little House on the Prairie!! (fingers crossed someone understands this reference ). Leave it unadorned, add a pretty crystal headband, or a statement flower crown, or pin in your fascinator and head to the races! The options are many and varied, and completely up to you. You can dress it up, or dress it down as you wish, which is one of the things that I love about this hairstyle.


I twist and pin sections along my hairline to
stop layers from escaping

From the back...


You can read all about Joico products here on their Australian website. 


 Are you a side chignon gal? Have you tried any Joico products lately that you love? Do leave a comment below if you would like to, I'd love to hear from you!


Thanks so much for stopping by!


Blessings,


Lou xo


Friday, 3 April 2015

Marie Claire The Parcel | Autumn Edit | Review


Good Afternoon beauties!

Bringing you the third instalment of The Parcel by Marie Claire today, the Autumn Edit.

I was sent the very first box as a press sample, and was planning to continue to purchase the next few edits, however I missed the cut of date for the Summer box, which I believe was very well received in the beauty blogger-sphere.

You can find my review of the first edition of The Parcel here, along with information regarding ordering options and costs.


I purchased this box as a one off, paying $29.95 ( including postage ), and was very much looking forward to it! I have mentioned in prior posts, that a crucial element of the whole beauty box subscription for me, is consistency. Companies will often hit it out of the park with the first couple of boxes, and then gradually descend into the less than exciting/mediocre land of disappointment.


Ok, Autumn Edit...let's see what you've got!


Marie Claire - The Parcel - Autumn Edit


Rimmel BB Cream Radiance RRP $12.95
One of two, full size complexion products, is the very new ( now in store ) Rimmel London BB cream Radiance. I was given the shade Light, which on swatching is very neutral toned, to the point of looking a little ashy on my skin, and has quite a thick, mousse-like texture. The Rimmel Matte BB cream is one of my absolute favourite drugstore BB creams. It has a beautiful satin finish on the skin  ( not really matte in my opinion ), lovely medium coverage, blends beautifully, and is very smoothing to my old pores. I am in the shade light in the Matte version, which is definitely warmer and slightly darker than this Radiance version. I would highly recommend swatching in store, as I believe these shades run quite light ( good news for those pale beauties out there ). I will put this one through it's paces and keep you updated.


Garnier Skin Naturals Miracle Skin Cream RRP $19.95
The second full size complexion product is one I have definitely had my eye on! Anna from Vivianna Does Makeup has spoken quite favourably about this product recently, and I am very keen to see how it looks and performs on my skin. It has quite a few nice ingredients, including one of my favourites, Niacinamide, which helps to renew and exfoliate the skin, aiding in the lightening of dark spots and pigmentation. My first thought was to try this as a base for mineral foundation, so I will keep you posted with my thoughts! It is one of those "colour adjusting" formula's that as you apply and work into the skin changes from white, to a flesh toned shade...some of these types of products end up being a little too dark for me... none the less, I am looking forward to testing it out!


Lancome Advanced Genefique Youth Activating Concentrate 7ml Deluxe Sample - Full Size 
RRP $95.00
A nice sized, high end skincare sample to try.... I haven't heard a great deal about this serum, but happy to pop it into the rotation, and see how it compares with my current favourites. It claims to address the many visible signs of ageing skin ( puts hand up ), so if it is worthy of a mention you may here about this one again. 


Max Factor Masterpiece Transform Mascara RRP $23.95
Another product that I have heard a lot about, I am keen to see if this one lives up to the hype! I believe it is a plastic wand, with shorter bristles, and a defining and lengthening formula. I have to say though that I believe that some Max Factor products are a little on the expensive side... has anyone else found that, or is it just me?  


L'Occitane Dry Skin Hand Cream, Deluxe sample, Full Size RRP $42.00
I was very pleased to see a little bit of L'Occitane in this box! I do love a little bit of L'Occitane!
I received the Shea Butter, and opened it up and slathered it on my hands straight away. A nice, little luxury addition, I'm sure most people would be happy to receive one of these. They are the perfect size for your handbag, and the formula is extremely nourishing without being too heavy or greasy.


MOR Emporium Classics Snow Gardenia Triple-Milled Soap RRP $19.95
Now, I don't mind the scent of Gardenia, in fact, it is one of my favourite flowers. However, I have to say that I was personally a little disappointed when I saw this. I ADORE many of the MOR scents... Blood Orange, Lychee...not to mention the gloriously beautiful Marshmallow, a huge favourite of mine. I am also not really a soap girl, and the scent of this is just a little headache inducing to me. Sadly, into the knickers draw it will go, or perhaps re-gifted to someone that might use and enjoy it. 


Schick Hydro Silk Razor RRP $14.25 &  Neutrogena Makeup Remover Cleansing Towelettes RRP $3.99
Two handy and practical products to include, both the razor and the wipes are great to have in the cupboard. I do not typically (aka ever) use wipes, however this little mini pack will be handy for travel, or to pop in your purse. 
I like the idea of the moisturising gel surrounding the blades on the razor... I only shave my underarms ( sorry...that's a bit TMI? ), so will throw this one in the shower and give it a go!


My thoughts...

Overall, I am very happy with the Autumn Edition of The Parcel. Like the first box I received, I think it represents excellent value, and contains a nice mix of cosmetics, skincare and body care. 

To be honest though, I wasn't quite as excited about this box. As I said, the MOR soap really isn't a hit with me, and considering the many other modern, stunning scents and products that MOR makes, I just feel that they could have done so much better!! I would have been happy with a little perfume sample, of any of the other scents that I mentioned above. Having said that, I'm sure there are many people who do love it, and will enjoy it.

The facial wipes are another thing, for me personally, that didn't really tickle my fancy, however I know many people use them all the time and love them. It is impossible to please everybody all of the time! The first box appealed to me immensely, though I am sure that for some it may not have. You have to keep these things in perspective I think.

All of the other products I will happily use and enjoy testing, I love that there are so many full size products, and I would still definitely recommend The Parcel to anyone considering trying a new beauty subscription box. I plan on purchasing the Winter Edit, and reviewing it for you as well.

Click the link here to find out all about The Parcel!


What do you think of the Autumn Edit? Have you tried The Parcel? Do let me know your thoughts below in the comments!


Thanks so much for stopping by!


Blessings,


Lou xo


Saturday, 21 March 2015

Current Evening Skincare Routine

I thought I would share my current evening skincare routine with you today. I have been using this combination of products consistently for about a month, and have seen some really fantastic changes in my skin. I have spoken about a couple of these products previously, and others are fairly new to me. These products have worked so well for me, that I am slightly anxious about changing anything. I cannot recall the last time I felt this way about a group of products, and though I still have many other product and brands loves, (and holy grail products), this combination has made my skin balanced, calm and just generally happy.

As a self confessed skincare junkie, I am always trying new products. I can't help myself really... everything about skincare and skincare products intrigues me. Now that I am on the other side of 40, I am certainly noticing more fine lines, wrinkles and general signs of ageing creeping up on me. Having said that, it really is just a part of life. You cannot stop ageing...time marches on folks, let me tell you. Aside from protecting your skin from the sun, and your genetic predisposition, your skin will eventually show signs of ageing. 

Thankfully for me, along with getting older, comes a little more life experience, a little more gratitude, and a wider, clearer view of what really is important. I have so many stretch marks on my stomach from my four pregnancies, my skin is so stretched and it really doesn't look pleasant at all, but they are my mummy scars. I would not be without them. They tell a story, just like the wrinkles around my eyes and mouth from smiling, and the frown lines between my eyes and on my forehead from thinking, questioning and learning about life. 

However, that being said, I still want my skin to look nice... I still want my skin to be free of acne, and I still care about how my complexion looks, and I want it to look it's best!

It may seem like a lot of products and steps, and it probably is! My evening routine is one of my favourite times of the day. My children are asleep, my husband is happily holding the TV remote, and I can enjoy a nice warm shower and look after my skin without having to talk to anyone...silence is golden folks, I'm here to tell you! As much as I enjoy applying my makeup, I think I might enjoy taking it off even more. I do all of my cleansing steps in the shower. It just works for me that way. I am not suggesting you need to do all of these things either, but I enjoy the process...it makes me happy!


Let's go then!


Yep...it takes a whole bowl!


Cleansing...


Ole Henrikson pure truth melting cleanser  is a beautiful cleanser that I purchased whilst in New York last year. The tub in the picture above is in fact almost empty, and I have just repurchased another. It goes on the skin as a thick, smooth gel, and as you massage it in, it melts into an oil. It is the most beautiful texture, feels beautiful on the skin, and removes all of my makeup, leaving my skin feeling amazing. It has a beautiful citrus scent, which I love, and it has not caused me any irritation. 
I use it as I would a cleansing oil, straight onto dry skin. You can emulsify it with a little water, and it turns into more of a milky consistency, but I prefer not too. I enjoy the slip and texture of the oil on my skin. Once you emulsify it, you loose that slip.
If the thought of using an oil cleanser scares you a little, you need to try this. It leaves absolutely no oily residue on the skin. After a nice massage, I then remove it with a clean face washer/flannel. The trusty face washer is the only skincare 'tool' you will find in my bathroom. I have a huge pile of them, and I use a clean one every day. I have not tried a clarisonic, or any other cleansing devices as yet. I am happy with my flannels so far! I like to spend a few more dollars and get the nice, soft thick ones, as they hold the warmth of the water beautifully.

One pump of Go-To Properly Clean is my second cleanse. I am a fan of the double cleansing method, and it has worked well for my skin for the better part of two years now. Properly Clean is a gentle, lightweight, fluffy mousse cleanser that I love. I have reviewed it in full here. It smells heavenly, feels beautiful, and rinses away perfectly. I am coming to the end of this bottle too, and shall be repurchasing it very soon. Why does all the good stuff run out at the same time!!??

One of the more recent editions to my night time routine has been the Exfoliator from Indeed Labs. Gifted to me for trial purposes, I have indeed been trialling it ( excuse the pun ) and I love it. It follows a similar concept as the much talked about Daily Microfoliant from Dermalogica ( which I have not tried ), in that it dispenses as a powder, that you then mixed with water to create a thick, soft foam. Containing rice bran powder, hyaluronic acid, and some trusty fruit enzymes, this leaves my skin feeling smooth and generally looking clearer and brighter. I tap a small amount into the palm of my hand, mix it really well with a little bit of water for about 10 seconds between my palms until it resembles a soft foam, and then apply it to my face, avoiding the eye area. I don't really massage it in, I just softly move it around my face with my fingertips for about a minute... I prefer to let those lovely fruit enzymes do all the exfoliating. I find it to be very gentle, it rinses away beautifully, and leaves my skin feeling so soft and just lovely. Worthy of note, the price point is certainly a little friendlier than the afore mentioned... you're welcome.


Hydrating...

Antipodes Ananda Antioxidant Rich Gentle Toner is my first layer of hydration after I step out of the shower. This is my second bottle. Definitely a hydrating mist rather than a traditional "toner", I spritz my face like a mad woman, breathe in the beautiful, subtle bulgarian rose scent, and then pressed it into my skin with the palms of my hands. Glorious. I also love the People for Plants hydrating mist, and the Sukin Hydrating Mist if you are looking for a slightly less expensive alternative.

My next step is to move straight onto the eyes, and the cooling metal ball and lightweight serum from the Puretopia Eye Rescue does the trick for me ( love this in the morning as well ). Vitamin E and Shea butter moisturise, whilst peptides and Vitamin C are said to reduce puffiness and brighten the eye area. I apply it along the orbital bone, starting in close to the nose and then out and up to my temple, and then pat it in with my fingertips. The tube is soft and pliable, so you just gently squeeze it to dispense a little of the serum onto the tip of the metal ball. Eye Rescue always makes my under eye area look refreshed and hydrated, without feeling too heavy or greasy. I haven't noticed a huge difference in the discolouration under my eyes ( about 6 weeks of sleep might help ) but my fine lines are certainly less noticeable!


The next lightweight layer is thanks to the Puretopia Essential Facial Serum. It feels amazingly light on the skin considering it consists of skin loving Argan, Rosehip, Seabuckthorn, Cranberry and Blackcurrent oils, along with Glycerin, and Shea butter. This product is a bit of a gem actually. As you can see in the photograph above, the Eye Rescue roller is on the left, and the Essential Facial Serum is on the right. Three small metal roller balls dispense a very light, buildable layer of serum onto your skin. Time can get away from me when I use this! It is just so lovely to roll all over your face! I try to encourage lymphatic drainage by working from the centre of my face outwards, and like to focus on my jaw line, as I am experiencing a bit of congestion around that area. The compact little bottle works  with gravity, so you just need to tip it up to dispense the serum as you go. I just use a very light layer underneath my new favourite treatment serum...


Treating, Protecting and Nourishing...


I first heard about the Olay Regenerist Luminous Daily Treatment serum when Ruth, from A Model Recommends, trialled it for Olay. She had very good things to say about it indeed, and I absolutely trust and value Ruth's opinion on skincare, so I picked it up during a recent sale at my local Priceline pharmacy.
When I was checking the ingredient list in store, I was very excited to see Niacinamide was the second ingredient. Niacinamide, also known as Vitamin B3, hydrates the skin, assists in cell turnover, improves skin elasticity, and helps to reduce hyperpgimentation. I adore this serum, and have definitely noticed that my skin tone is more even and looks brightened and refreshed in the four weeks I have been using it. I also feel that it has contributed to the fading of old acne scaring. Apologies for using this word again, but it is very lightweight, and absorbs quickly and easily into the skin. I have even been using my chemical exfoliants ( AHA's and BHA's ) considerably less often since I started using this serum. I'm absolutely impressed, and would highly recommend it. I haven't even felt the need to repurchase my Estee Lauder Advanced Night Repair....now that's saying something folks.

Last, but certainly not least...the final layer...the final frontier...absolutely the last layer I promise... is Go-To Face Hero, one of the most deliciously gorgeous face oils I have ever used. I was lucky enough to have received an email two weeks prior to the official launch date, with an offer to make an early bird purchase....and purchase I did!
I could see a very noticeable difference in my skin after using this for two days! I left a comment for Zoe Foster Blake ( Go-To creator and all round fabulous woman ) on Instagram a month ago, saying that my skin was calm, happy and hydrated, and it has since stayed that way. I have also noticed a reduction in oil production, and almost no breakouts....yep, really! I'm thrilled to bits!
Face Hero contains a blend of 10 beautiful, skin loving oils, including Almond Oil, Jojoba Oil, Macadamia Oil, Brazil Nut Oil, Evening Primrose Oil, Buriti Oil, Arnica Oil, Rosehip Oil, Calendula Oil, and Kiwi Seed Oil. 
It has a beautiful, subtle, natural fragrance of Orange Blossom and Rose Gardenia. Not at all strong or overpowering, I can still smell the earthiness of the natural oils underneath. I smooth 4-5 drops over my face and neck, and chest area every night. It has a lovely, velvety consistency which my skin just drinks up. I cannot say enough good things about Face Hero... he truly is a little bit of magic to me!


Phew. You made it to the end...thank you! I'd love to know your favourite skincare products! Are you a skincare addict like me? Do leave a comment below if you would like to, and feel free to ask me any questions you may have and I'll do my best to answer them!


Thanks so much for stopping by!


Blessings,


Lou xo


Disclaimer: Products from Indeed Labs and Puretopia were PR gifts. All other products were purchased/repurchased by me! Cheers, Lou xo

Monday, 16 March 2015

My Natural, Everyday Makeup Look with Youngblood Mineral Cosmetics

I have used, and enjoyed mineral makeup for the last four to five years. As someone with acne prone skin, I was initially drawn to it because of it's lightweight, but buildable coverage that was going to let my skin 'breathe' and not exacerbate my acne. I have tried quite a few different brands and formulas over the years, and when offered the opportunity to try Youngblood Mineral Cosmetics I said yes please!

Today, I have some thoughts to share with you regarding the products, and some photographs of the makeup on my skin. I created a very quick and simple everyday look using the products below. This type of makeup look is really the only one I am good at!! I have been putting my "face on" for many years now, and honestly I do wear some sort of makeup on a daily basis. Some people may be gasping in horror, but most people who have experienced acne, or any other disfiguring skin condition will probably understand. I do try to keep things looking as natural as possible, whilst evening out my skin and giving my face a bit of colour, glow and subtle definition. 

I was surprised to discover that Youngblood Mineral Cosmetics were founded in 1996, almost 20 years ago! Pauline Youngblood, founder and president of Youngblood Mineral Cosmetics, used her knowledge and experience as a medical aesthetician to develop a range of mineral based cosmetics that would provide excellent coverage, whilst still allowing the skin to breathe. The first product developed,  the Natural Mineral Foundation, and was designed for patients recovering from laser treatments, acne, rosacea and cosmetic surgeries. Free of talc, oil, parabens, fragrance, Youngblood boast luxurious, lightweight, and non-comedogenic formulas in sleek, sophisticated packaging, and are cruelty free.


YOUNGBLOOD  Pressed Mineral Eyeshadow Quad - Timeless
L-R Doe, Coco, Desert, Haze.
Swatched in indirect natural light.

Youngblood Mineral Cosmetics
L - R   Lipgloss - Da-ja Vu,  Pressed Mineral Blush - Blossom
Pressed Mineral Eyeshadows as per previous swatches.
Swatched in direct natural light


Natural Mineral Foundation - Soft Beige

If you are familiar with mineral foundations, you may be aware that the formula's can vary greatly, depending on the brand. Some are more on the dry side, and others are more creamy. This mineral powder falls into the creamier category, and I really like it. On the skin, it gives what I would call a satin finish, not shiny or sparkly, just natural and glowing. The shade I have is in Soft Beige, which is a pretty good match for my light-medium skin tone. It has a slight yellow undertone which I prefer as it helps to counteract the redness I can experience in my skin at times.

I start with a small amount tapped into the lid, pick up the powder with a kabuki brush, hold it upright and tap the base of the brush lightly in the palm of my hand. I personally like to do this, as it allows some of the minerals to drop into the bristles. When you first place the brush to your face, an overloaded brush can mean that the product can look at little heavy in that area. As I said, this is just the way I like to do it to avoid any areas looking cakey. A light hand is best with creamy formulas like this one in my humble opinion. I start on one side of my face, on the cheek area, and blend the foundation in circular motions around my cheeks, sweep it down the side of my chin, up and across the side of my nose, and then up to my temples and forehead area. I then repeat the same process on the other side. Without adding any more product, I will then spend a few minutes lightly buffing the minerals into my skin. I find that as you do this, the minerals can really blend into the skin, it perfects the finish and improves the coverage without adding any additional product. Like many cosmetic products, it is best to start with a little a build up coverage gradually. For the photographs below, I did one layer of the mineral foundation. You can still see some of my pigmentation and freckles peaking through, which I don't mind at all. I'm not about full coverage for my everyday makeup, but I think one layer gives me a nice medium coverage, evens out my skintone, and gives my skin a nice fresh look. If you compare the skin on my neck and chest area to my face, you can see the coverage that it gives.
I like to follow my mineral foundations with a good spritz of a hydrating facial mist. I find that it helps the foundation to meld with the skin. Youngblood do have a variety of facial mists available, however I have not tried them. I will share some of my favourite hydrating mist toners in another post!

Ultimate Concealer - Medium

This concealer is quite creamy to touch and easy to blend, and can be applied lightly for sheer coverage, or built up to a medium coverage. Some concealers with particularly emollient formulas can slip and slide on the skin, however this one does not. I found it best to apply with a flat concealer brush, and then blend a little if needed with my fingertips. I also used a thin layer of this as my eyeshadow primer and it worked a treat! I found that it did not completely cancel out the bluish undertones I have under my eyes, but it did diminish them nicely for an everyday look. I did have to build up the concealer over a few pesky blemishes, but it did the job nicely and I was able to blend away the edges easily.
I always apply my concealer after my mineral foundation. I have never had any issues doing it this way, and find if I use it prior to the minerals I end up just buffing it away. 

Pressed Mineral Blush - Blossom

An everyday makeup look is never without blush for me. It is a staple in my routine, and is one product that ALWAYS makes me feel, and look fresher and a little more awake than I typically feel! 
Blossom is a beautiful pinky/peach shade with what I would call a slightly warm, almost terracotta undertone, perfect for an everyday natural look. It has a matte finish, however the finish on the skin is not flat at all. I added a little of the eyeshadow in the shade Desert straight over the top of the blush, to give a little bit more glow ( cos when you're 40, you need all the help you can get.. ).


Pressed Mineral Eyeshadow Palette - Timeless

A lovely neutral eyeshadow palette with 3 matte shades and one shimmer. The formula of all four shades is smooth and blendable. The lightest shade Doe, does not swatch particularly well on my arm, however it works beautifully as a matte highlight on the browbone. The shade Coco, described by Youngblood as a medium, warm chocolate brown also has a matte finish, and I applied it all over my lid and up into my crease. I used my finger to tap a little bit of the shade Desert, a peachy golden shimmer, onto the centre of my lid. As I mentioned earlier, I also used this shade on my cheeks, over my blush to add a subtle glow.
I used the cooler, grey toned shade Haze softly along my upper lash line with a small angled brush. Using the same brush, I took a little of both Haze and Coco, and filled in my brows. These pressed shadows really adhere nicely to the skin, and I found these two shadows to work perfectly to even out my brows and give them a little bit of definition. You could certainly build up the colour if your brows are darker than mine. These eyeshadows are a pleasure to use, and quite multifunctional...gotta love that!


Lipgloss - Da-ja-Vu

Smack bang on the rosey brown/neutral lip trend, this lipgloss has become a firm favourite of mine. It is not sticky in the least, very nourishing, gives your lips a plump, hydrated appearance whilst conditioning them with natural oils. It has a really nice amount of colour pay off, and works perfectly on its own without any other lip product required. I adore this formula, and feel absolutely compelled to own more shades...

All photographs below are unedited and were taken in natural light to try to give you the most honest representation of not only my skin, but the colours of the products that I used. I am a makeup enthusiast, not a makeup artist, and I am also not in my first flush of youth, so please be kind!


You can click the link Here to go to Youngblood Australia's website, where you will find a plethora of information and all of their products. You will also find lists of stockists, both bricks and mortar and online. I found quite a variation in pricing on some of the online stockists, so I have not included individual pricing in this post. I will say that they do tend to sit in the mid to higher end in terms of pricing, however I would not hesitate to recommend them, and would indeed spend my own money to purchase more. 


Have you tried any Youngblood Mineral products? Are you a mineral makeup lover? Let me know your thoughts below in the comment section...I always love to hear from you!


Thanks so much for stopping by!


Blessings,


Lou xo


Related Posts Plugin for WordPress, Blogger...