Friday, 7 November 2014

Sephora Haul | Part One | Bite Beauty & Too Faced

I will admit to feeling a sudden increase in heart rate, and became aware of small beads of perspiration forming on my upper lip as I caught site of the unmistakable black and white framed mothership of beauty that is Sephora. 

My spirits soared as the escalator swiftly delivered me to the top floor of the building at No.10 Columbus Circle. With trembling limbs, I managed to deftly navigate my way through a stream of busy New Yorker's... I was focused...I was driven...I was going shopping.

I was going to Sephora.

I was greeted by smiling, friendly staff, who were consistently helpful and attentive. I think I may have met them all twice. Though I would have loved to have been colour matched, and spend some time with the MUA's, what I really wanted to do was just explore. Pick up, feel, look, touch and swatch many of the products that I had only ever previously seen through my computer screen.

I did try to be careful, and quite a few things that were placed into my little silver basket were hence removed and put back on the shelf. My aim was to try and get a little of everything, makeup, body care and skincare, though to my surprise I actually managed to leave without purchasing one nail polish. There might have been a certain Marc Jacobs shade in my basket for a spell, but he was returned in favour of what I am about to share with you today...well, one of them anyway!

I thought I would spread my show and tell over a couple of posts, otherwise things might get a little picture heavy, and I may run out of places on my body to swatch!

Today's part one features the brands Bite Beauty, and Too Faced lip products. Luscious lip pencils and lacquers to make the beauty lover swoon...both brands were on my list to explore.

  Come and see what I chose...


Too Faced Melted Liquified Long Wear Lipstick   Top - Melted Candy   Bottom - Melted Berry
RRP $21.00 US


A fairly recent release in Australia, the Too Faced Melted Liquified Lipsticks have received many positive reviews online. I was actually looking for the holiday set which featured four of the shades, but was unable to find it. These two shades were the ones that appealed to me initially, so in the basket they went. Melted Fig was a front runner but alas was sold out. They are both ridiculously pigmented, Melted Candy was almost too intense to capture in a photograph. On swatching the formula reminds me of the Rimmel London Apocalypse Lip Laquers. I will keep you posted on my thoughts.


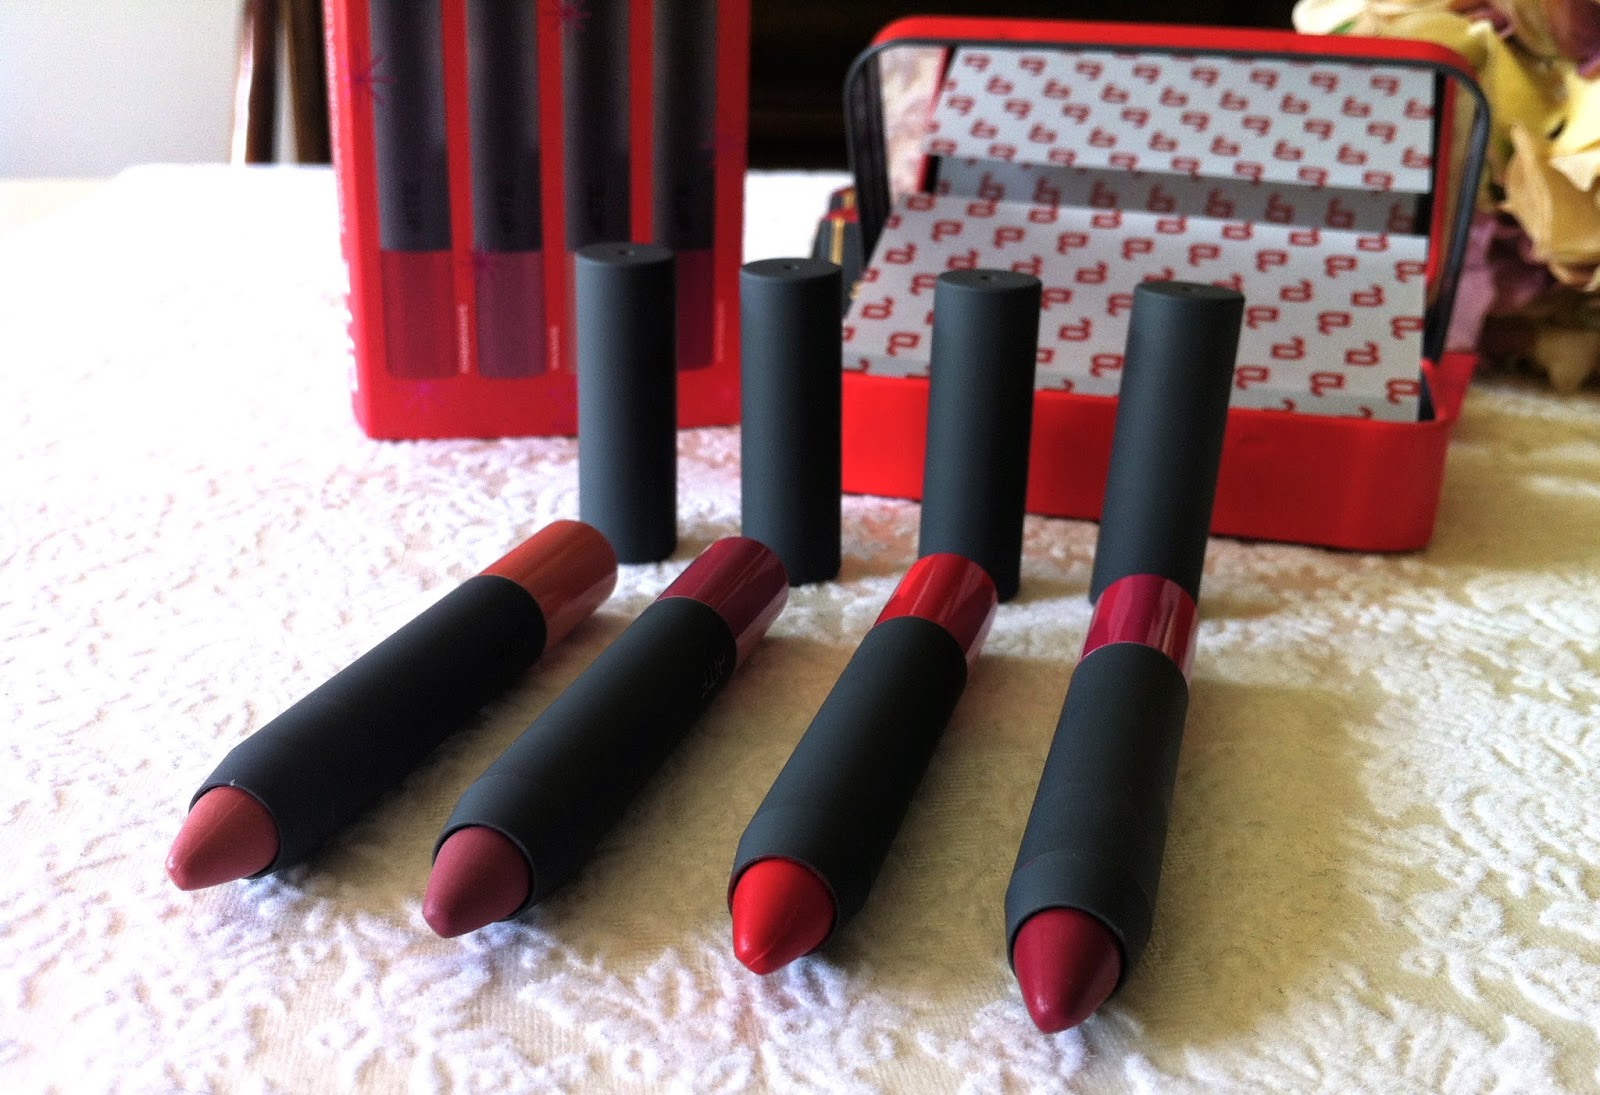
Bite Beauty-  Best Bite Remix Holiday Set   RRP $25.00 US

This little set of mini's represents great value in my opinion, and I could not walk past it. I have always wanted to try Bite Beauty products, and this set gives me four shades to play with, and an opportunity to gather my thoughts on the all natural, food grade ingredients that the brand is famous for. I have to say I am excited to try all four of them. I think the set has a brilliant range of shades, from nude to neutral, cool toned red to deep berry... there is definitely something for everyone. I think I may struggle to choose a favourite...


Bite Beauty High Pigment Lip Pencils L-R  Sable, Rhubarb, Pomegranate, Winterberry


LEFT - Bite Beauty, Sable, Rhubarb,  Pomegranate, Winterberry       RIGHT - Too Faced Melted Candy, Melted Berry
Photographed in direct natural light


Shades as above photographed in indirect natural light


Bite Beauty High Pigment Lip Pencil
L-R  Sable, Rhubarb, Pomegranate, Winterberry
I have included this third photograph of swatches above, because I believe that it represents the truest colour/shade representation.


I am so excited to get these on my lips! Have you tried any Bite Beauty Lip products? I did toy with the idea of trying to visit the Bite Beauty Lab whilst in New York, but I just ran out of time! Do you have any favourite Too Faced Melted Lipstick shades? I would love to hear from you!


Do stay tuned for the next instalment of Lou's Sephora Shenanigans...I promise I'll spare you the overly dramatic introduction next time. 


Thanks so much for stopping by!


Blessings,


Lou xo

Wednesday, 5 November 2014

The Weekend Mix...with Indeed Laboratories

With the festive season approaching at the speed of light, as it always seems to do at this time of the year, getting your skin party ready in preparation for the many Christmas, and end of year events ahead is a good idea.

We all know how much your makeup application and wear is affected by the condition of your skin. I can really notice the difference in how my makeup looks when I have taken the time to prepare my skin beforehand. Today I have some Indeed Laboratories products to share with you to get your complexion looking plump, hydrated, glowing and party ready!

These four products were sent to me for review and consideration recently, and I thought I would share my thoughts with you today on how I find best to use them. Described as the "Weekend Mix", these four products certainly work very nicely on their own,  however put them all together and you'll discover a really nice pre-party pamper combination.

Ready to glow? Read on!


indeed Laboratories Moisture Boosting Mask

Cloth facial masks have really surged onto the skincare market over the last 12 months. I love them. Their packaging lends well to travel, and the single use feature is clean, convenient and ensures the freshness of ingredients. Their ease of use also gets a thumbs up from me, not to mention giving your family a good fright when you emerge from the bathroom looking like something out of a horror movie!

When indeed Labs Hydraluron Serum was first released in Australia, I was there lining up with fellow skincare junkies to get my hands on it. This is mostly due to Caroline Hirons singing its praises...those who follow her will know that for a time it was affectionately renamed "Hironsluron"....I digress...

Whilst I did have good results with the serum, after some weeks of use I noticed that it was feeling a little tacky on my skin, and took a while to absorb. Anyone else find this?

In any case, the Hydraluron Moisture Boosting Mask does not have this effect, and I think it is a beautiful sheet mask, that gives great results...quickly. The serum that soaks the cloth seems to be a lighter, more fluid consistency, full of hyaluronic acid which draws moisture to the skin and holds it there like a magnet. Another moisture holding ingredient, glycerin, aids in hydrating the skin, whilst the addition of vitamin E heals and protects.

After cleansing, I will open the sheet mask carefully, place my hands at the bottom of the packet, and gently try to squeeze out the excess serum that the cloth is floating around in. There is 20ml of serum in each of these masks, you might as well get the benefit of all of it I say! I smooth that extra serum over my skin first, and then open out the mask and apply to my face.
Alternatively, you can squeeze out the remaining serum from the package after removing your cloth mask, and smooth it over your face and down your neck then. Completely up to you.

Now the instructions say relax for 10-15 minutes, so I will typically fold washing, attend to childrens needs, start cooking dinner etc. however I do recommend you try to have a rest. Relax on your bed. Stop checking Instagram and Twitter, close your eyes and take some deep breaths. Try to fit in a little "me time" if you can.

After 10-15 minutes, remove the mask, dispose of the cloth, and massage in the remaining serum that is left on your skin. I will make sure to pat some around my eye area as well. My skin looks hydrated, and feels plump and comfortable.

On to step 2....


indeed Laboratories eyesilix Instant Eye Rescue

I have mentioned in previous posts that tend not to get along with a lot of eye creams. I will often use whatever serum I have in rotation around my eye area in place of a designated eye cream. They are often notoriously expensive, and with the exception of a few, leave me with puffy, swollen eyes because they are just too heavy and rich.

Eyesilix is a no fuss, fragrance free, lightweight eye cream that I have been enjoying, both morning and night. It works really nicely under makeup, and provides a nice smooth, hydrated base for my concealer. It does have a very subtle light-reflective quality, and is also very smoothing on the fine lines around my eyes. I haven't noticed a great deal of difference in terms of a reduction in darkness under my eyes, so perhaps this is something that comes with long term use.

A little goes a long way, I take a small amount of product, pat it between my fingertips, and then pat it gently around the contours of my eyes.

Step three coming up... ( hope you are still with me! )

indeed Laboratories Pepta-Bright Intense Brightening Treatment

Dullness?...Yes!   Dark Spots?...Yes again!

Indeed Labs describe pepta-bright as a cream/serum hybrid. For my oily/combination skin I find it does the job of both serum and moisturiser. It feels very nourishing, though still lightweight enough to absorb nicely into the skin. Like eyesilix, it adds a very subtle glow to the skin.

I do believe that regular use of Pepta-Bright is helping to improve the appearance of some areas of hyperpigmentation on my face. It does contain lactic acid, which is one of the more gentle acids that aid in chemically exfoliating the skin. I feel it is important to note here that I use other products in my skincare routine that are also working well to assist in reducing the appearance of my pigmentation. 

For an event or party, I will normally reach for a long wearing, medium to full coverage foundation. I have found that Pepta-Bright provides a really nice base for makeup on its own, without the use of an additional primer. This of course is up to your own personal preference.


indeed Laboratories Nanoblur

Nanoblur is not designed to be a makeup primer. It is your finishing step...your magic wand...your instagram filter in a tube.

This silicone based gel is designed to smooth over and diffuse the look of fine lines, enlarged pores and wrinkles. It is recommended to use after your foundation, and before your powder. 

I like to use it as one of the final steps in my makeup, just prior to applying a setting powder. 

I take a small amount on my fingertips, smooth them together to spread a thin layer of product, and then tap the product gently over the areas I feel I need it. If I need more, I will dispense another small amount onto clean fingers again, and repeat.

It does take a little practice in order not to disturb your foundation, but if you use small amounts, and a light hand it will work beautifully. The product tends to get tacky and set quickly, so I try to wait after the first layer for a minute. Being patient and waiting will likely give Nanoblur time to do its blurring magic. If you keep on layering too quickly, you are more likely to disturb the foundation underneath.

The areas I focus on are around my eye contour, where I have fine lines, and also around my nose and down the side of my mouth, where I have larger pores and fine lines, and my forehead ( yes ok basically everywhere! )

This may all seem a little fussy, but once you get the hang of it the results are really lovely, and definitely worth it for me for a special occasion or event.

All that's left to do is to decide which shade of lipstick to wear! 


So there you have it loves! I would love to know if you have tried any of these indeed Laboratories products? I know they have recently released a new Moisture Jelly, and powdered Exfoliant, and I have heard great things about both...have you tried them? Do I need them on my list? Do you have a favourite skin pampering routine before a special event? I'd love to hear from you!


Thanks so much for stopping by!


Blessings,


Lou xo


Disclaimer: As mentioned in the body of this post, I was gifted the above mentioned products. My thoughts are always my own, and are offered after appropriate time to test and form my own opinions. Cheers xo


Friday, 31 October 2014

MAC New York Haul

A visit to the MAC store was high on my list on my recent trip to New York. As we only had a short time in the city, and believe me there is so much to see and do, I knew I had to be decisive and focused! Although I would have loved to be colour matched for base products, and filled my basket with a million goodies, I just didn't have time, so it was lipsticks and eyeshadows that came home with me. The MUA that helped me was lovely...seriously could have played in there for hours...

So a little show and tell today, 4 new lippies and an eyeshadow quad that I put together. I love everything, and am very happy with my purchases...come and have a look!


The Loot...


L-R   TWIG,  BRICK-O-LA,  CRAVING,  LUSTERING

I was really keen to try a couple of different finishes in the lipsticks. Both Brick-O-La and Craving are Amplified, and are both stunning! Gorgeous saturated colour, Craving leans a little more plum, and Brick-O-La a warmer, muted, very wearable red. Twig is a Satin, and has a comfortable, satin/matte finish on the lips. I have worn this quite a few times...it is an absolutely gorgeous, deep neutral and it fits the nineties lip trend very nicely!! Lustering was calling to me...such a beautiful shade, and it is a Lustre finish. These types of shades can be a little intimidating in an opaque formula, but this is sheer, moisturising and just really pretty for spring/summer!


L-R  TWIG,  BRICK-O-LA,  CRAVING,  LUSTERING


As I mentioned, the MUA that helped me was lovely ( so sorry I can't remember her name ), and helped me put together these four gorgeous shadows. My aim was to have lovely warm shades, and I am so happy with my choices. On a side note, these are my first MAC eyeshadows...

Both Woodwinked and Mythology are perfect lid shades that I will happily blend up into the crease. I have wanted Woodwinked for the longest time, and Mythology has the most beautiful rose gold tone. Love them both! Rice Paper is a beautiful highlight shade for me...it is a soft, pale gold that gives a gorgeous, subtle glow to the inner corner and brow bone. Brown Script was my choice for a deeper toned matte shade. I love its warm, reddish undertones...I have been loving this on my top lash line instead of liner. 


L-R   RICE PAPER,  WOODWINKED,  MYTHOLOGY,  BROWN SCRIPT

Slightly out of focus...but gosh it shows the gorgeous glow of Woodwinked and Mythology!


I am very happy with my new lovelies! Do you have any of these shades? I would love to know your favourite MAC eyeshadows and lipsticks, please feel free to leave a comment below!


Thanks so much for stopping by!


Blessings,


Lou xo

Monday, 13 October 2014

Quick Update...The Beauty Vine and The City

Hi lovelies!

Just a quick little update/chat post to let you know that in a few short hours I will be leaving Aussie shores and landing here...


...TOMORROW!!

It is only a short trip ( 5 days to explore the city ) but I am so excited!!

I have a plethora of beauty posts coming your way on my return, so please don't think I have forgotten about you! It will be only my husband and I going, so preparing my household for my family to care for our 4 children whilst we are away for a week has not allowed me much time to pre-prepare posts for the blog. My apologies!

I will no doubt be sharing bits and pieces of the trip on my Instagram page, and be doing a wee bit of beauty shopping, so look out for my posts on there if you are interested to see what I get up to!!

Thanking you in advance for your patience and understanding! I'm off to paint my nails, have a cup of tea, and go to bed in some vain attempt to sleep!!

Have you been to New York City? I would love to hear about your favourite New York things... and what you enjoyed most...and where you love to shop of course!!

And rest assured...if I happen to bump into Carrie and the girls, I'll be sure to tell them you said hi...


Blessings,


Lou xo


Photo Credit: @tuulavintage from Instagram with the caption " Sunset light over Central Park "

Wednesday, 1 October 2014

PRICELINE HAUL

I had a rare opportunity today to have a little bit of time to myself, and of course I felt the need to do a little retail therapy... what else would I do??!! I also realised that I haven't really done many "hauls" as such on my blog, and while I love watching haul videos on You Tube, I know that some people really don't fancy them. Do let me know your thoughts in the comments below. To me, I feel like I am just sharing the excitement of my purchases with a friend...

I am missing the usual trademark pink Priceline bag today, customers were being given these fancy schmancy L'Oreal bags... I could have fit way more in there!!

Come and see what I got!


Only 5 things!! So restrained!!

Bondi Sands is currently 50% off at Priceline...get on it beauties! I have used the Light/Medium tanning lotion before, and find it to be easily to apply ( I use a tanning mit ), it gives a really lovely natural colour, and smells gorgeous. I am interested to give the tanning foam a run for its money, and will keep you updated in future posts. Lily white limbs be gone!


L'Oreal True Match The Concealer - Shade 03

This concealer has been on my radar for a very long time, and I have only recently seen it appear in the L'oreal display in my local Priceline. It gets a very good rating on Beautypedia, for both coverage and blendability. I picked up the shade 03, which may be half a shade too dark for me. I had a play with the tester, and the texture reminds me of the Maybelline Fit me concealer, which I love. Again, will keep you posted! L'Oreal is currently 30% off. 


Essie Lux Effects Multi Dimension Top Coat - Stroke of Brilliance

This glitter has been calling my name for what seems like an eternity ( slight over-dramatisation ). Today, she came home with me! I am planning a manicure with this beauty, we'll see how it turns out! Sometimes glitters don't translate well on the nail, and the beauty that you see in the bottle is lost. Fingers crossed! If it's any good I will share! 


L'oreal Paris Extraordinaire Lip Colour 101 Rose Melody

I can't seem to pass up these lip colours from L'Oreal. This is my 4th!
I love them. I love the formula. The shade range is beautiful. Big thumbs up from The Beauty Vine. I have a swatch below of Rose Melody. Do let me know if you would like to see swatches of the other shades that I have, happy to oblige!


L'oreal Infallible Eyeshadow 006 All Night Blue

Ok, another huge lemming here. I can't tell you how many times I have picked this up and then put it back again! Apparently today was the day it stayed in the basket! Isn't this the most stunning blue? I have plans to use it as a liner...can't wait to play...


L- L'Oreal Rose Melody     R- L'Oreal Infallible All Night Blue


I hope you enjoyed seeing today's purchases! Have you been makeup shopping lately? Do you like to shop online, or in-store? I like both! ( quelle suprise )


Thanks so much for stopping by!


Blessings,


Lou xo


Disclaimer: I have no affiliation with Priceline pharmacy. This post is not sponsored. I just can't seem to help myself. Send Help! Cheers xo

Sunday, 28 September 2014

THE PARCEL by marie claire | Spring Edit | Review

Holla beauty babes! There's a new kid on the 'beauty box' block! 

The Parcel by marie claire has launched this month, offering beauty lovers a luxe sample box of seasonal beauty bits to keep you looking gorgeous this Spring. 

Containing products hand picked by the Beauty Editors of marie claire magazine, The Parcel is not your typical beauty subscription service, allowing the customer several different payment options. The Parcel will be released quarterly, with each box representative of the beauty must haves for each particular season. 

The first box, and the one I have to share with you today, is the Spring Edit. I was gifted this box for the purpose of reviewing and sharing the contents with you, my readers.

You may choose to purchase each parcel as they are released, which will set you back $25.00 AU each. Alternatively, you can subscribe to all four parcels for $90.00 AU, giving you a $10 saving. There is also an offer on the website to combine a yearly subscription to marie claire magazine, along with a yearly The Parcel subscription.


Let's have a look inside!


marie claire The Parcel - Spring Edit
A nice personal touch, the outer packaging of The Parcel has your name and address printed on it. I have just covered mine with the wee purple flower for privacy reasons.


marie claire The Parcel - Spring Edit


marie claire The Parcel - Spring Edit
The goods...


Lancome Visionnaire Advanced Skin Corrector 7ml ( Full size 30ml $97.00 AU ).

Being the skincare obsessive that I am, I was very chuffed to see some skincare included in the box, and from a luxury brand as well! This is the newly released Skin Perfecting Serum from Lancome. I shall be happily throwing this into my serum rotation, however this deluxe sample size would also be perfect for travel. Nice.


Benefit They're Real Push-Up Liner deluxe mini ( full size RRP $35.00 AU ) and They're Real Mascara deluxe mini ( full size RRP $38.00 AU ).

Not one but two Benefit products! One with a cult following, and the other a new release this year. I have heard quite mixed reviews of Benefit's Push-Up liner, so am very interested to form my own opinion. If you can see in the photograph above, they have managed to design the mini with the same silicone tip that you see on the full size product. I have tried They're Real mascara before, and while I love the intensely black, volumised, gorgeous lashes that it gives you, I also find that it transfers to my upper eyelid. I do know of many people that really love this mascara, and I think both of these products are really exciting inclusions.


Revlon Colorstay Moisture Stain 005 Parisian ( RRP $25.95 ).

We have just seen these launch in Australia in the last month, and I had not yet purchased any shades, so I was excited to see this full size product! My shade, Parisian, is right up my alley!! 
There are 12 shades available in the range, and there will be varying shades throughout the boxes. This can be a bit pot-luck, however sometimes you find yourself challenged to move out of your comfort zone, and try something you may not have chosen for yourself.


L'Oreal Paris Elnett Satin Purse-size Hairspray ( RRP $4.95 ).

Personally, I am a fan of L'Oreal Elnett Hairspray, so this purse-size will definitely come in handy! It is a great formula, never feels crunchy or sticky in your hair, and brushes out easily. I have re-purchased many times, and happy to have a little baby one! 

Pantene Pro-V Daily Moisture Renewal Shampoo & Conditioner 40ml ( RRP 200ml $4.99 ).

The Parcel states that this is Pantene's new formulation, which I don't believe has been released in-store yet? I believe these are a bonus inclusion in this Spring Edit. Perfect travel size bottles, these will accompany me on my next holiday. I am fairly consistently switching up my hair care, and love trying new products, and testing out new formulations.


Gwen Stefani by OPI Nail Laquer  - Love. Angel. Music. Baby.  - $19.95 AU each 
(six shades available). 

Oh a full size OPI nail polish! Be still my beating heart! One of the more expensive polishes for us Aussie girls, I know many people just can't justify paying full price for OPI.  Now I admit, I have quite the collection of OPI polishes, but I had not purchased any shades from the Gwen Stefani collection. I am happy to have this pretty, almost matte finish pale gold. I have applied two coats, and no top coat in the photograph above. I believe that most of the shades in the collection are fairly universal, and would appeal to most people.


I am very impressed with The Parcel's Spring Edit. I think that it represents excellent value for money, and I feel that the $25.00 price tag is very reasonable. 

I really like that it is quarterly. I have found with beauty subscription boxes in the past, ( and I have tried quite a few! ) that the monthly box can become a little tiresome. Some boxes are great, others leave a lot to be desired. There is nothing worse than opening up your box and being disappointed.
I will admit, with previous companies, I have ended up with a large variety of little samples, and products that I just don't reach for, and have given many away to friends and family. I can honestly say that I will enjoy trying all of these new products ( yep, I'll even give the mascara another go! ).

I like the included brands. There is a good mix of both high end and less expensive brands. I think that it is important to have a good balance where that is concerned. We all know, that a higher price point does not always mean a better, or more effective product. However, the inclusion of the more luxe brands gives you an opportunity to try products that you might not wish to otherwise part with your hard earned money for.

I think there is a nice balance between the different products. This Parcel included skincare, makeup, nail polish and hair care. I like having a little bit of everything to try, and I think a lot of people would appreciate this as well.


You can find The Parcel here

You can sign up for this Spring Edit box now! I have just now checked the website, and they are still accepting orders, so be quick lovelies!! Your Spring Edit will be delivered to your door between the 6-10th October.

The Parcel is currently only available in Australia.

Have you signed up for The Parcel? What are you thoughts on the products included? Do you feel that it represents good value? Let me know in the comments below! I have tried lots of beauty boxes in the past, I would love to know what you think?


Thanks so much for stopping by!


Blessings,


Lou xo


Disclaimer: My review and thoughts are always honest, whether I have purchased a product, or it has been provided for my review. I have purposely not viewed, or read any other reviews prior to publishing my own. I will be signing up myself for The Parcel, and will continue to provide reviews of each of the boxes as they are released. Cheers xx

Friday, 26 September 2014

UNAIL One Step Polish | Review

In recent months we have seen an influx of at-home gel nail polish kits from several well known brands, offering the polish lover the convenience of a lustrous, long lasting manicure, without the salon prices. Of course, the added benefit of being able to sit at home in your pj's, with messy hair, not a stitch of makeup, and a glass of vino nearby also gains points in my book.

Personally, I enjoy painting my nails, and am quite happy to change my polish a couple of times a week. However there are many people who either don't have the time, nor the inclination, and that's where the gel mani enters its own. They are also perfect for holidays/vacations, when you don't want to have to worry about packing nail care items and polish to take with you.

Along with it's long lasting properties, comes one of the ultimate benefits in my mind, and that is a manicure that once cured under a LED lamp, is completely dry. Yes, no smudges, no dings, no dents. No sitting around like a princess praciticing your spirit fingers. You can freely, without worry or concern, rummage around in your handbag for your credit card whilst online shopping, and not damage the beautiful mani that you just spent valuable time perfecting.

UNAIL One Step Polish is a Brisbane based brand that contacted me recently to try their gel polish. I was immediately intrigued to learn that this gel polish does not require a base or top coat, hence, the "One Step" name. It claims to last to seven days without chipping, cracking or peeling. Nice.

UNAIL One Step Polish have a beautiful selection of 36 polishes, ranging from pretty pastels, modern brights, and deep, vampy shades. There is certainly something for everyone! I have the shades Petal, Whisper and Kingfisher to show you today. I have tested and photographed the wear over a seven day period of one the shades, Petal, and will share a few of my thoughts about the process along the way.


UNAIL One Step Polish - L-R  Petal, Kingfisher and Whisper

Each shade comes with a clip-off swatch ring...a very handy feature indeed. I likey. The swatches are a fairly good representation of the shade that will appear on the nail. If I was to be picky, the colours appear on the nail a little more intense, and a little brighter than shown on the swatch. For the purposes of storage, and being able to easily identify the shades, they are perfect.


Simple, easy to follow instructions

In my kit I received three UNAIL One Step gel polish shades ( 15ml each ) and the UNAIL One step remover, which is essentially pure acetone. I already own an LED light, it is very basic ( ie has an on and off switch ) however UNAIL do sell their own curing light which looks to be very nice quality, large enough to fit your whole hand in at once, has a timer, and comes in pink ( onto the Christmas wish list it goes ). My light is long and narrow, which means I need to cure my thumb separately.

The instructions are very easy to follow... 


PREPARE - I just did what I normally do prior to a mani change. Remove old polish, file and shape if necessary. Prior to starting your polish application, you need to dehydrate your nail bed. I used a cotton bud to apply a small amount of the acetone to each nail. If you have not done this before, do not be alarmed if your nail turns into a ghostly white, chalky mess. This is what acetone will do, and if it gets onto your skin it will do the same. It is just drying out the surface. A clean, dry surface will ensure the best result for your gel manicure. I like to use a balm on the skin around my nails prior to using the acetone, though I am extremely careful not to put the balm anywhere near my nail. This is certainly a step that you can leave until after you have done your manicure.


APPLY - I find it best to work with minimal polish on my brush. You have plenty of play time with these formulas, as they do not start drying or thickening as you apply them. They stay nice and fluid. I wipe of my brush on the neck of the bottle, and do the first pass in the middle of the nail, from just before the cuticle to the end of the nail. I then go back and wipe a little more off the brush, and then continue to apply the polish to both the sides. UNAIL highly recommend sealing the free edge of your nail, I just used whatever polish was left on the brush, turned my brush on its side, and gently dragged it across the edge of my nail.


CURE - I used my trusty iphone timer function set to 60 seconds, and cured my first coat. One thing I found easy with this system, is that there are no differing times required for each coat. I have used brands in the past where the base coat is 30 seconds, the colour coats are 60 seconds, and the top coat is 90 seconds. It is a small, but appreciated feature for me...and it is good to appreciate the small things yes? It is really up to you as to how many coats you eventually do. I found that three thin coats was required for the shade Petal to reach the opacity that I wanted. Whisper and Kingfisher were an easy two coats, and in fact Kingfisher ( the stunning, glowing blue shade ) could have almost been a one coater. As with all polish brands, there will undoubtedly be variation in the opacity of the formula.


ENJOY - it would be indeed a worry if I needed to comment on this aspect, however, I will say that for those who are used to doing a top coat, and then removing the sticky layer that forms on top of the polish with acetone, you do not need to do this! Once your desired colour/opacity is reached, its lights off and done. Back to the dishes, folding washing, flicking through fabulous fashion magazines, running your fingers through your hair...you get the picture.


REMOVE - I recently saw a video on You Tube by Tati ( GlamLifeGuru ) who shared a tip on removing gel polish, and I thought I would share it with you! Gel polish removal wraps can be a little pricey, so she suggested grabbing a big old pack of cheap bandaids, applying the acetone to a cotton swab, placing it on the nail, and securing it with a bandaid. Works a treat. One bit of advice I will offer for the removal stage is to leave them alone for 10-15 without disturbing! The first few times I removed my gel polish I was impatient and wanted to check them every few minutes, paranoid about soaking my nails in acetone for too long. What I ended up doing was having to either reapply another cotton swab, and do the whole process again, or pick/scrape off the remaining polish. I am telling you lovelies, if you wait the appropriate amount of time, you will remove the bandaid and the polish will have lifted off the nail and just be sitting there. More damage was done to my nails by having to scrape/pick the polish off.
I follow removal with a hefty dose of nourishing oils/balms/butters.


UNAIL One Step Polish - Petal - 3 coats


UNAIL One Step Polish - Petal - Day 4


UNAIL One Step Polish - Petal - Day 7

As you can see from the photographs above, my polish certainly lasted the 7 days without chipping, peeling or cracking. The gloss and shine did dull a little by day 4-5, but they still looked nice. 
These photographs are of my left hand. I did have one nail on my right hand which did chip, however this was because I caught my nail in the sodding cutlery drawer and broke the edge of it. Ouch. Otherwise, it is a big thumbs up from me! Some people may find that they will have their mani last longer than the 7 days. Personally, I don't like seeing the big gap between the polish and my cuticle, so off it came. Plus, I wanted to swatch the other shades!! See below!!


UNAIL One Step Polish - Whisper and Kingfisher - 2 coats each

Two more very pretty shades. Love them both! I didn't test the wear for this manicure, but I can say they are both beautiful to apply, opaque in 2 coats, and nice and glossy!


You can find UNAIL's website here
They are based in Brisbane, Queensland, Australia.


Starter kits are available to purchase, as well as individual shades, LED lamps, and accessories. I find the prices to be very reasonable, and comparable to what you would pay elsewhere for other brands. Each full size polish is $20 AU, which I will gladly pay when I order some more shades!


I am also extremely excited to let you know that the lovely people at UNAIL will be offering my readers a discount code which will entitle you to Free Standard Shipping within Australia! This code will be valid until 31st October.


Discount code : BLOGBEAUTYVINE


I would love to know what shades tickle your fancy! Have you tried UNAIL One Step Polish?


Thanks so much for stopping by!


Blessings,


Lou xo


Disclaimer: As mentioned in the body of this post, these products were provided for the purpose of review. There are no affiliate links present. I do not receive renumeration when you use the discount code, it is just for you, courtesy of the lovely people at UNAIL. Cheers.
Related Posts Plugin for WordPress, Blogger...